|
|
Windows Xp Qcow2 ((new)) Jun 2026To revert to a specific snapshot: While raw disk images offer raw speed, QCOW2 provides advanced features indispensable for virtualization management: The blue screen of death (BSOD) flashed briefly— STOP: 0x0000007B . Windows XP does not pass fstrim commands back to the host. To shrink your QCOW2 file size down to its actual utilized space, perform a manual zero-fill inside the Windows guest using the Microsoft Sysinternals tool SDelete : sdelete -z c: Use code with caution. Shut down the VM. You can now safely change your primary QCOW2 drive interface from bus=ide to if=virtio . Network and Graphics Tweaks windows xp qcow2 This comprehensive guide covers everything you need to know about creating, configuring, and optimizing a Windows XP QCOW2 image. Why Choose QCOW2 for Windows XP? By running Windows XP in a containerized VM with no network access, you can use it safely without risking modern devices. How to Set Up Windows XP Using a .qcow2 Image : Compressing a QCOW2 image (using qemu-img -c ) can significantly reduce file size (e.g., from 48GB to 19GB), though it may occasionally impact runtime performance depending on the host. 3. Common Platforms & Availability Running Windows XP inside a QCOW2 container provides excellent flexibility for retro gaming, legacy database access, and industrial software emulation. For the best experience, keep the VM isolated from the public internet using QEMU's -net user mode to protect the unpatched operating system from modern network exploits. To revert to a specific snapshot: While raw Are you planning to use this Windows XP image for or for retro gaming ? Alternatively, mount the VirtIO floppy disk image ( virtio-win.vfd ) as a virtual floppy drive during the VM setup and press when the Windows installer starts. Step 3: Installing Windows XP on the QCOW2 Image Boot into Windows XP and point the "Found New Hardware Wizard" to your VirtIO driver ISO. Once your virtual machine is running smoothly, use these maintenance strategies to keep your image optimized. Compressing and Shrinking the File Shut down the VM Once the VirtIO driver installs successfully, shut down the VM. (Optional, for setting up specialized machine types). 2. Creating the Windows XP QCOW2 Image Running Windows XP in QEMU: A Comprehensive Guide to QCOW2 Images Whether you need to connect (like USB-to-Serial adapters or older dongles). You can create snapshots, allowing you to "freeze" the system state and revert instantly if a legacy driver or software causes a crash. |
Windows Xp Qcow2 ((new)) Jun 2026Since different computers have different configurations, some old model computer may install the games slowly. Here is a tip which make your computer speed up in installing the PS2 games:
*NOTE* USB Extreme Win32 utility (Windows GUI) - Allows easy installation from your CD/DVD drive to your USB HDD USBInsane (Windows GUI) - Allows you to install an ISO stored on the PC HDD as well as the CD/DVD drive. USBeXtreme (DOS) - The setup program containing the format and install software The DOS version is more stable and has a higher success rate for proper installations, but is not as simple as the GUI version. So we will guide you thru the DOS version. USBeXtreme User Manual(MS-DOS mode) Before Starting: To use the USBeXtreme on your PS2, you will need a USB Hard drive Enclosure with Hard drive installed (both devices are sold separately), either 3.5' or 2.5' USB Hard drive Enclosure with Hard drive can be use. *For the installation of a Hard Drive into your USB enclosure, please refer to the user manual of the USB Enclosure if its the removable type. Hard Drive preparation If you are using a new
hard drive, you will need to initialize the hard drive with Windows
2000/XP.(For Windows 98/ME
user, you will need other Disk Management software, like, Partition
Magic to initialize and format the harddisk) To initialize the
hard drive, connect the hard drive enclosure to your PC's USB port and install the
driver if its
required, then go to Start
and right
click My Computer >
Manage
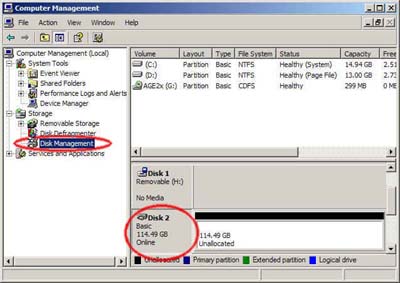
> Disk Management. * For the driver installation, please refer to the user manual of the hard drive enclosure* After that you will able to view all drives installed in your PC, select the newly installed hard drive, right click and choose "initialize", follow the on screen instruction and the hard drive will be initialized by your PC and assign a driver letter to it. You can format the drive by using NTFS format in order to use up the maximum space of the hard drive. Create a Primary Partition of the max space available.
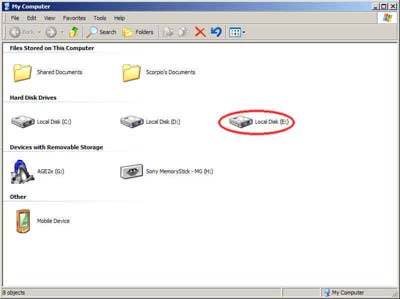
If the hard drive has formatted and assigned a drive letter successfully, you will see a new drive in "My Computer"
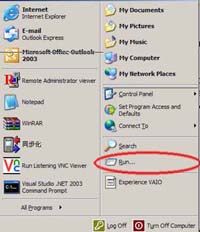
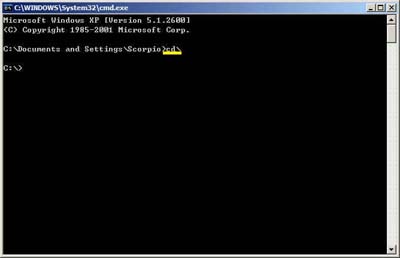
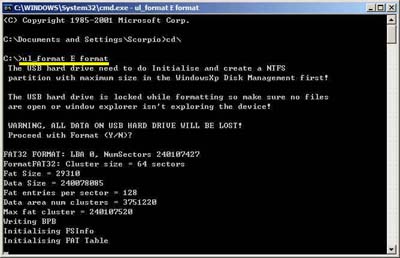
Formatting for USBeXtreme Download the DOS software of USBeXtreme from the link above, unzip the file and run the USBeXtreme_setup.exe file, then the tools will be extracted into the drive C. Please DO NOT change the default installation path except you are familiar with MS-DOS command. After extracted the USBeXtreme Client software, go to "Start" then "Run", Enter "Command" or "CMD" to open a command prompt. Change the directory to the root directory C drive by entering command cd\ and press enter, you will see C:\> appear on the command line. You can refer to the following picture.
Then you can enter the following command. ul_format X format "X" is the drive letter of your USB hard drive.
The format action will take a
few minutes, it is depends on the capacity of the partition you
created, please DO NOT remove the hard drive or power off the USB
harddisk enclosure during this period.
Game Converting To convert games from CD/DVD drive to the USB hard drive, please connect the USB drive to your PC, then go to command prompt "Start" > "Run" > enter Command or CMD, change the directory to the root directory C drive by entering command cd\ and press enter, you will see C:\> appear on the command line. You can refer to the following picture.
This is the DOS command required to install. [color coded for easy understanding] ul_install SourceDrive TargetDrive GameName Disc e.g. if your DVD/CD-Rom drive is drive D, and the USB harddisk is E, and you are converting a PS2 DVD game "Metal Gear Solid", the command will be the following ul_install D E MetalGearSolid DVD you can refer to the following picture 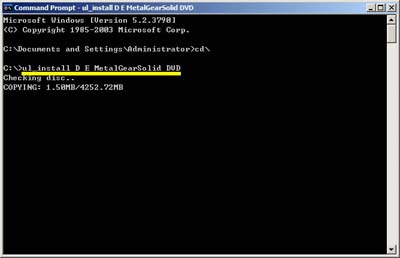
Game converting will take a
few minutes depending on the game disc size.
Game Playing Connect and power on the USB
harddisk to your PS2 and boot your PS2 with USBeXtreme, when you see
the game selection menu, select the game and press X on the joypad, the
game will then run immediately.
|
|
|